Introduction
In your Customer Administration account, you can easily add the contact details of authorised persons, assign them user subaccounts, access to MasterDC datacentres and different permission levels. You can make these settings in the Users management section. In the following guide, we will show you how.
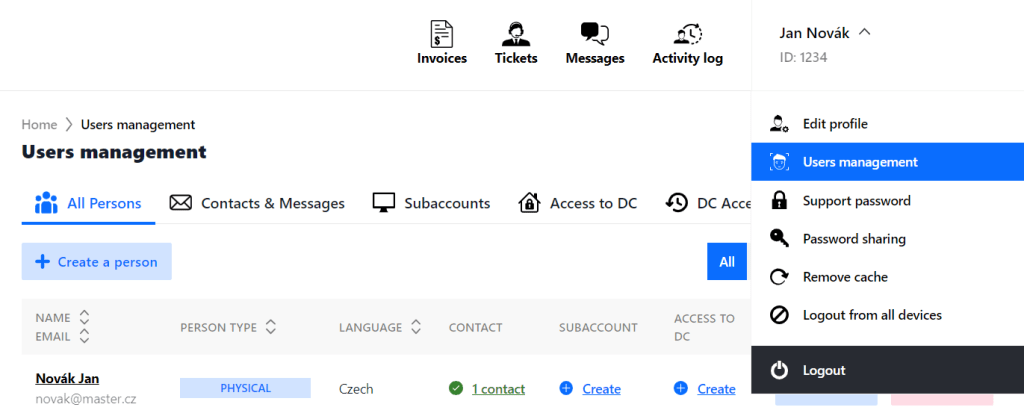
Log in to Customer Administration. Then, click on your Username > Users management in the top right corner. The basic unit to work within this section is the person. After creating a person, you can perform further follow-up actions. These instructions will further describe what types of persons can be made.
You will find the following tabs on the top bar of the Users management section.
- All Persons – A list of persons granted any rights in Customer Administration.
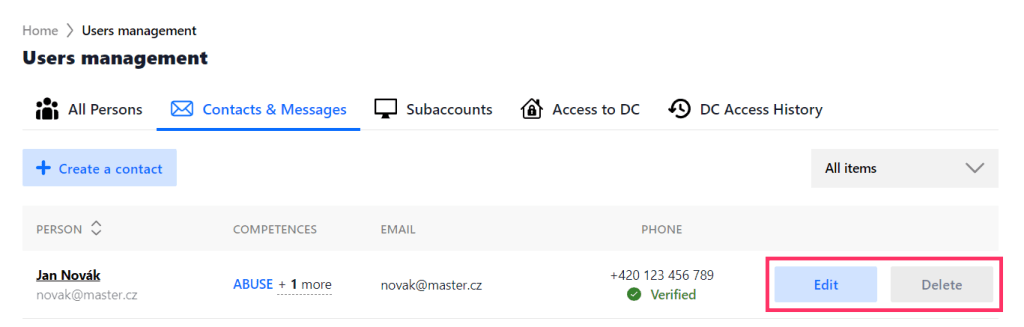
- Contacts & Messages – Information related to services and other selected areas is communicated and sent to contacts according to their assigned competencies. Depending on the severity of the communication, they may be contacted by telephone or by sending email messages. A contact can only be added to a created person.
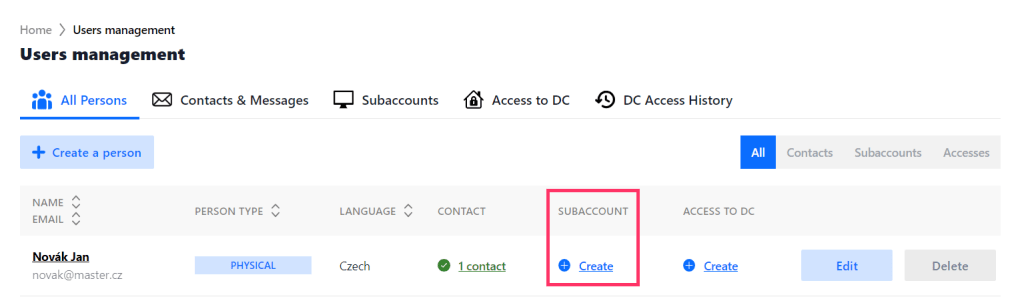
- Subaccounts – A subaccount can be created for a person. This person will then access Customer Administration using their login credentials and can view selected parts of the main customer account.
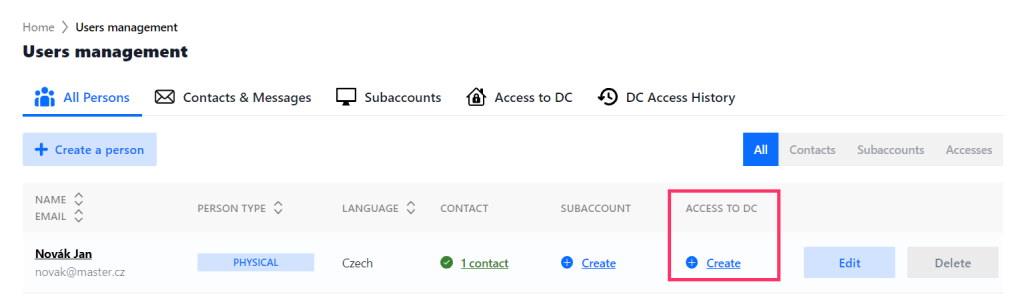
- Access to DC – Persons with access to DC are authorised to access selected technologies in MasterDC data centres.
- DC Access History – An overview of data centre access records.
Physical And Virtual Person
You can create two new types of entities in the Users management section – a physical and a virtual person. To create a contact, a subaccount to Customer Administration, and access to DC, you need to create one of these persons first:
- A Physical Person can be granted access to DC, create a subaccount to Customer Administration, and be used as a contact for communication with MasterDC.
- A Virtual Person is only used as a contact for communication with MasterDC. It is not possible to create a subaccount for them or grant them access to DC. This type of person can be used, for example, for the billing department, IT department, and other team mailboxes.
Create A New Person
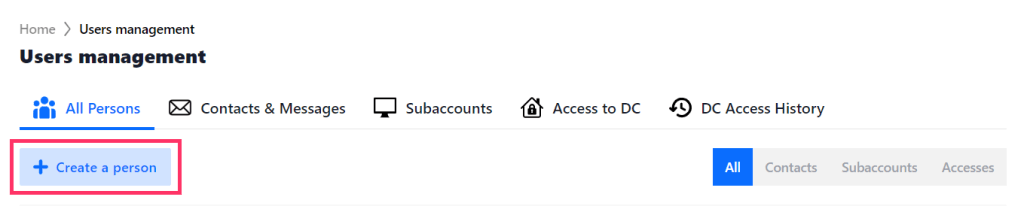
On the All Persons tab, click the Create a person button:
- Select whether you want to create a physical or virtual person.
- For a physical person, fill in the First Name, Last Name, Primary Email, and Language. Just enter the Name, Primary Email, and Language for a virtual person. Click Continue.
- To complete the process, create at least one of the following for a physical person: contact, access to DC, or a subaccount. For a virtual person, create at least one contact.
Edit The Person Type
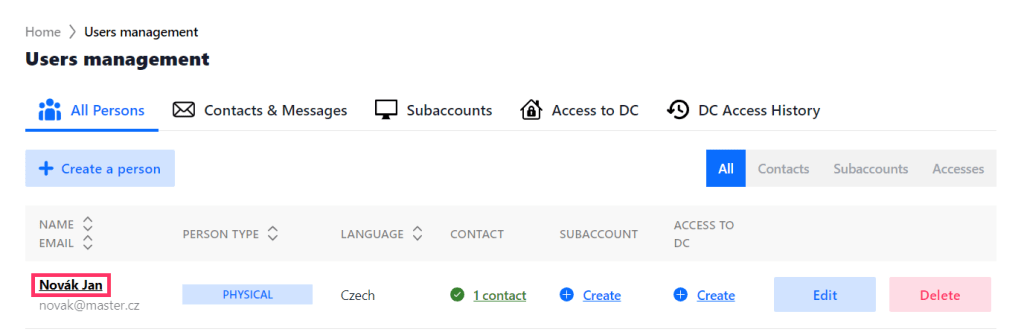
For existing contacts, the default setting will be a physical person. You can change this setting in Users management > All Persons > Edit. Alternatively, you can click on a specific person to go to Person Detail > Person > Edit.
A physical person can be edited to virtual only if they have not yet been assigned a subaccount or access to DC. A virtual person can be switched to a physical person at any time.
Person Detail
Click on a person’s name to go to the Person Detail tab. There, you can view all the details of personal data and the granted rights. The rights and person details can also be modified using the buttons in the relevant section.
Similarly, you can edit a person’s details and rights in each of the Contacts & Messages, Subaccounts, and Access to DC tabs.
Create A Contact
Contacts can be created for both physical and virtual person. Each person is associated with a primary email address, which represents that person in the system. A single person can have multiple contacts, such as secondary email addresses or phone numbers. These contacts can be assigned different competencies that determine which types of messages they will receive.
Most information is delivered by email. If necessary, the person may also be contacted by phone. For more details, see Decription of Competencies (Message Types).
Let us look at how a contact can be made. The first step follows creating a person, as outlined in the previous point.
- In the All Persons tab, click the Create a person button and select whether they are a physical or virtual person.
- Click Continue and fill in the person’s information.
- Click Continue again, and then select Create a contact from the menu of options.
- Select one or more Competencies (message types) for this person. The primary email address is prefilled; you can keep it or replace it with a different email address for receiving these messages. You can also add a phone number and a note. Confirm everything with the Save button.
- If you have provided the person’s phone number, click the Verify phone number button and then use the Send code button. Wait for the SMS code to be sent to the phone number and enter the code.
- If you have problems verifying the person’s phone number, contact our technical support at support@master.cz.
You can also create a contact in the Contacts & Messages tab:
- Go to the Contacts & Messages tab and use the Create a contact button.
- Select the person you want to create a contact for from the list and click Confirm selection. If the person list is empty, you will be redirected to create a new person.
- Select one or more Competencies (message types) for this person. You can provide the person’s phone number, a secondary email to which messages will be sent, or add another note. Confirm everything with the Save button.
- If you have provided the person’s phone number, click the Verify phone number button and then use the Send code button. Wait for the SMS code to be sent to the phone number and enter the appropriate code.
- If you have problems verifying the person’s phone number, contact our technical support at support@master.cz.
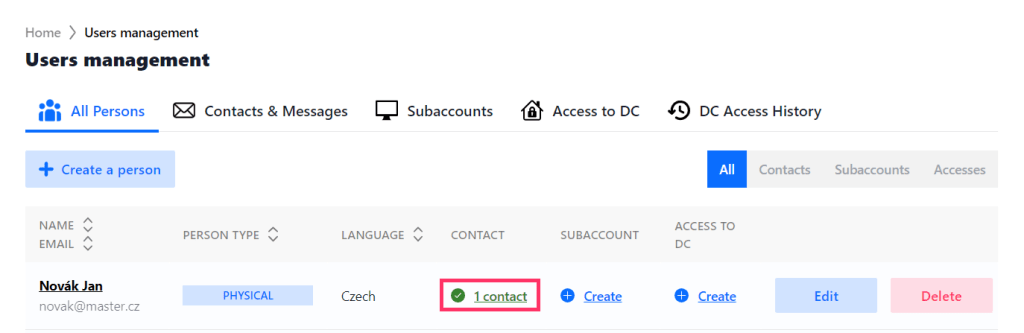
In the All Persons tab, you will find a table containing a list of persons and their details. Another way to create a new contact is to click on a person’s existing number of contacts in the Contact column and then continue with the Create a contact button.
Description Of Competencies (Message Types)
In Customer Administration, competencies are defined as a specific area that can be assigned to a person (see the description below). In accordance with these competencies, the person is contacted by MasterDC – most of the information is given by email, but, if necessary, by telephone.
You can assign the following Competencies (message types) to persons:
- Abuse (misuse or attack on the service)
- Events (invitations to lectures and webinars)
- Tech (scheduled maintenance, downtime, etc.)
- Business (important business announcements, contracts, etc.)
- News (news on services and technology)
- Billing (service billing)
- Security (messages related to access recovery and account security)
The main contact (account holder) is assigned all responsibilities in the default setup. This setting can be changed and transferred to other persons. However, you must first assign the competencies to another person and then remove them from the main contact. Using the Edit or Delete buttons, you can also make these changes in the Contacts & Messages tab.
Apart from the categories of News and Events, each competency must be assigned to at least one person. Multiple competencies and contact details can be assigned to one person. You can create another contact for an existing person in the Person Detail section or the Contacts & Messages tab via the Create a contact button.
Create A Subaccount
A Subaccount for Customer Administration can only be created for a physical person, and each person can only have one subaccount. As in the previous point, you can create a new person via the Create a person button in the All Persons tab.
- Create a physical person and fill in their First Name, Last Name, Email, and Language.
- Click Continue to go to the Options tab.
- Select Create a subaccount.
- Set the permissions for the subaccount – for a more detailed description, see Description of user permissions.
- Click Continue to navigate to the Support password section; if you want to restrict rights for a subaccount, you need to fill in a unique password (different from the main account password) to communicate with MasterDC Technical Support. Confirm everything with the Save button.
The person to whom the subaccount has been created will then receive an email with their generated login name and instructions on how to set their password.
You can also create a subaccount in the Subaccounts tab:
- Click Create a subaccount.
- Select the person for whom you want to create the subaccount and click Confirm selection. If the person list is empty, you will be redirected to create a new physical person.
- Set the permissions for the subaccount. For a more detailed description, see Description of user permissions.
- Click Continue to navigate to the Support password section; if you want to restrict rights for a subaccount, you need to enter a unique password (different from the master account password) to communicate with MasterDC Technical Support. Confirm everything with the Save button.
In the All Persons tab, you can see a table with a list of persons. You can also create a subaccount by clicking the Create button in the Subaccount column.
Description Of User Permissions
- Administrator (full rights) – A user with full rights has complete control over the customer account. They can add other authorised persons, manage services (create new services, change configurations, etc.), view activity logs, or change customer account data (addresses, contacts, payment methods…) and more.
Services:
- Edit services – Allows modifying service parameters, controlling them, sending service cancellation requests, or accessing automated service setups.
- View services – Only allows viewing service descriptions and details; services cannot be edited.
- View service statistics – Allows viewing network traffic statistics for servers and connectivity links.
Technical Support:
- Create and edit tickets – Enables ticket creation and sending to MasterDC technical support.
- View tickets – Allows read-only communication with technical support; tickets cannot be created or responded to.
Other:
- View invoices and payments – Allows access to billing information, invoices, and payments made through the GoPay payment gateway.
- View system messages – The user can view so-called system messages that inform, for example, about the progress of inquiry processing and other requests that are subject to approval or require manual verification by MasterDC.
- Access to password sharing – Allows access to the secure password-sharing section with MasterDC staff.
Create Access To DC
Access to DC can only be created for a physical person. As in the previous points, you can create a new person via the Create a person button on the All Persons tab:
- Create a physical person and fill in their First Name, Last Name, Email, and Language.
- Click Continue to go to the Options tab.
- Select Create Access to DC.
- In the Information section, you can further identify the physical person – specify the company they work for, write a note, or allow them access to the DC with an escort. Confirm the information by clicking Continue.
- Next, in the Identification section, select how this person’s identity will be verified. Confirm with the Continue button.
- In the Access section, select one or more services that this person will be allowed to access. Confirm with the Save button.
Access to DC can also be created through the Access to DC tab:
- Click Create Access to DC.
- Select the person you want to create access for and click Confirm selection. If the person list is empty, you will be redirected to create a new physical person.
- You can then further identify the person – specify the company they work for, write a note, or allow them to access DC with an escort. Confirm the information by clicking Continue.
- Next, in the Identification section, select how this person’s identity will be verified. Confirm with the Continue button.
- In the Access section, select one or more services that this person will be allowed to access. Confirm with the Save button.
As with a subaccount, you can create access to DC using the Create button in the person list table under the All Persons tab.
Assignment Of Existing Access
The Access to DC tab provides an overview of granted accesses to the data centre. We recommend manually assigning the previously recorded DC access to the relevant person in the updated version of Customer Administration if that person already exists in the list of All persons. This is possible in two ways:
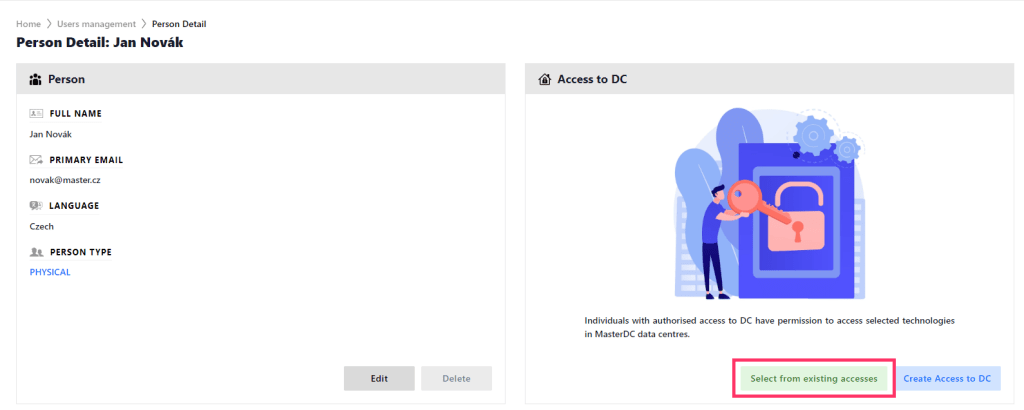
- Click on a specific person’s name to go to the Person Detail tab.
- From the Access to DC tab, click Select from existing accesses.
- Select the specific access from the menu and use the Confirm selection button. Always ensure you are assigning access to the correct person.
The second option is located in the All Persons tab. From the person’s name, click the Create button in the Access to DC column. The next process is the same as previously described.