Introduction
Customers of MasterDC Cloud Hosting services can manage their highly available virtual data center on the VMware platform via Cloud Director, a fully functional HTML5 web interface. Cloud Director is a leading global platform for delivering cloud services and managing their resources.
Login
For each virtual data center provided as part of the Cloud Hosting service, customers also receive access to Cloud Director. You can log in using the URL provided by our administrator in the order ticket. The URL follows this format: cloud.master.cz/tenant/<customer_number>. For example: https://cloud.master.cz/tenant/1234.
The login credentials are as follows:
- Username: your customer number, e.g. 1234
- Password: the same password you use to access the Customer Administration
Customers have full permissions to perform all operations within their data center and its allocated resources.
Cloud Director Overview
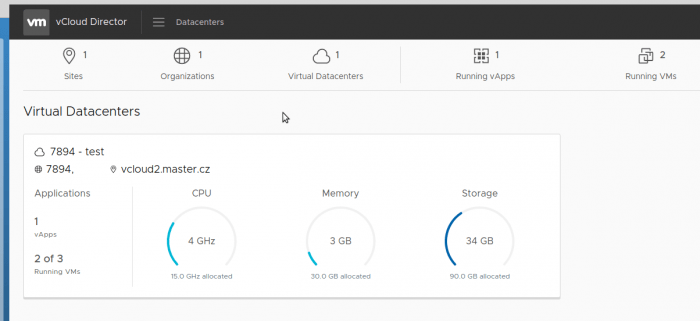
After logging in successfully, the main screen (shown in the following image) displays your virtual data center, including an overview of the number of running servers and allocated and currently used resources such as CPU, RAM, disk space, and networks.
The following figure provides a quick overview: we have three servers in total, two of which are currently running. The total allocated CPU capacity is 15 GHz, of which 4 GHz is currently in use. The same overview is provided for RAM and allocated disk space.
After clicking on the relevant virtual data center, a list of vApps is displayed. When you have a larger number of virtual servers, you can organize them into logical groups called vApps.
The following screenshot shows an example with two vApps, including an overview of the number of virtual servers they contain, the resources they use, and the number of networks they contain.
At the vApp level, you can, for example, create private networks that are accessible only to servers within the respective vApp. Another advantage is the ability to configure permissions for different users for security purposes. For example, if multiple virtual servers are managed by different administrators (such as when reselling services), you can assign each vApp to a different user account. An administrator responsible for one server therefore cannot see objects in another vApp that they are not responsible for, and so on.
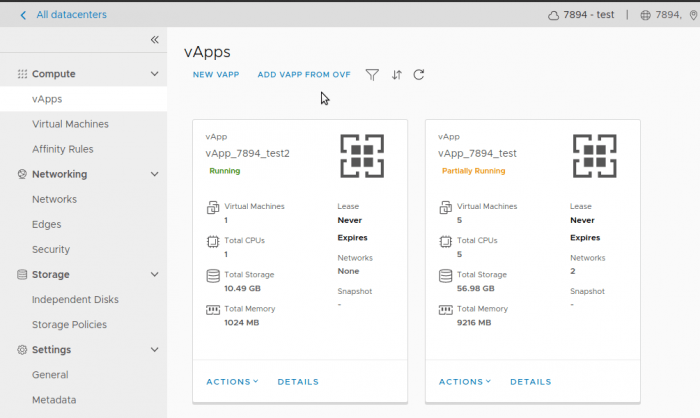
Clicking Details for an individual vApp displays general information such as the list of virtual servers in the vApp, the list of networks, their diagram, and other information.
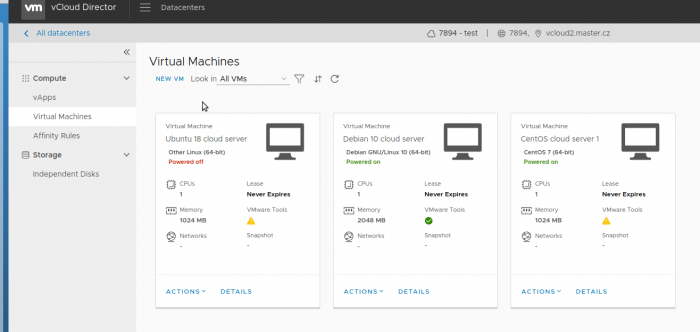
The Virtual Machines option in the left-hand menu opens the list of individual virtual servers.
As shown in the following figure, we have three virtual servers running different operating systems. Two are currently running, while the third is powered off. In addition to the server name and operating system, the overview also shows the server’s hardware specifications and other information.
Managing Virtual Servers
Clicking the Actions button for an individual virtual server opens the following context menu.
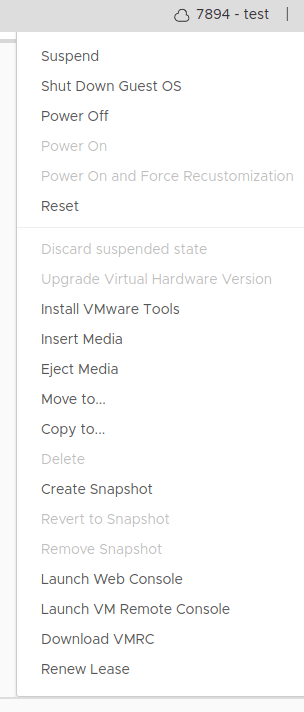
The menu provides the following options:
- Power On – powers on the virtual server
- Shut Down Guest OS – shuts down the server by properly shutting down the operating system
- Power Off – immediately powers off the server (equivalent to physically disconnecting the power supply)
- Reset – restarts the server
- Launch VM Console – opens the server’s web console
- Install VMware Tools – installs VMware Tools (see the VMware Tools section)
- Insert Media – mounts an .iso file from the catalog to the server (see the Working with the Catalog section)
- Eject Media – unmounts the currently mounted .iso file
- Move to – moves the server to another vApp using the Move function
- Copy to – copies the server to another vApp using the Copy function
- Delete – deletes the virtual server (the server must be powered off first)
- Create/Revert/Remove Snapshot – provides options for managing snapshots (see the Snapshots section)
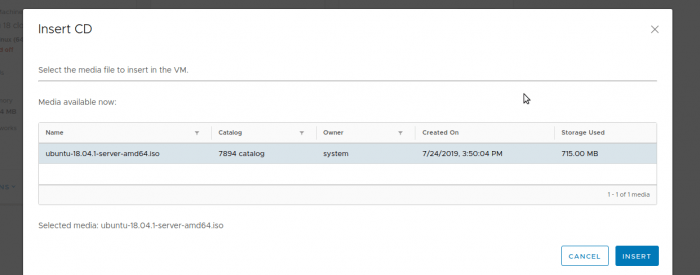
You can attach media, typically an operating system in .iso format, to a virtual server from the catalog. Under Insert Media, simply select a file from the catalog (see the following figure), after which you can boot the virtual server from the selected media. This is useful, for example, when reinstalling an existing server or installing a new one.
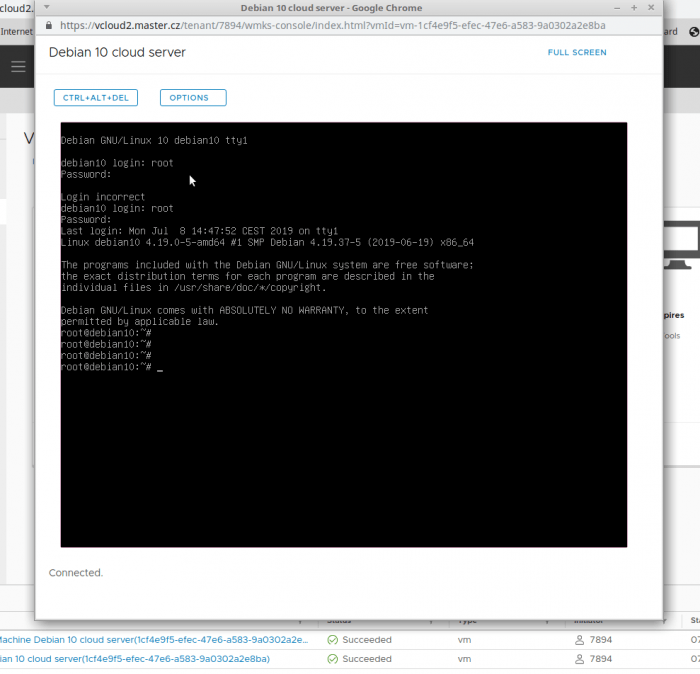
For emergency access to a server (e.g. when an SSH/RDP connection is unavailable), you can also access it through the web console, as shown in the following figure.
Editing VM Parameters
The parameters of each virtual server can also be modified.
- In the left-hand menu, select Compute > Virtual Machines.
- Find the required server in the list of virtual servers.
- Select Details.
- Here, you can change the server name and hardware specifications, expand or add another disk, or add/remove a network interface. If you enable Virtual CPU hot add and Memory hot add under Hardware before starting the VM, you can also add hardware resources while the VM is running, without having to power it off. Hardware resources cannot be removed while the VM is running.
Snapshots
Snapshots are most useful when you want to preserve the current state of a virtual machine and return to that state repeatedly. A snapshot captures the current state of the virtual server, including the data on its virtual disk, at the exact moment the snapshot is created. A snapshot can be created at any time, whether the server is powered on or off, and you can also revert to it at any time.
Snapshots are stored in the disk space allocated to customers within the VDC. If you want to use this feature, make sure you have sufficient free space available.
You can create multiple snapshots. However, creating a new snapshot replaces the previously created snapshot. Only one active snapshot can exist at a time.
When you revert to a snapshot, all changes made to the VM since the snapshot was created are discarded.
What Does a Snapshot Capture?
A snapshot captures the complete state of the virtual machine at the time it is created. It includes:
- the state of all virtual disks attached to the server;
- the contents of the server’s RAM;
- the VM configuration.
When you revert to a snapshot, all of these components are restored to the state they were in when the snapshot was created.
Creating a Snapshot
Create a snapshot as follows:
- Find the required server in the list of virtual servers.
- Select Actions > Create Snapshot.
Reverting to a Snapshot
Reverting to a snapshot restores the server to the state it was in when the snapshot was created.
As a workaround, follow these steps:
- Create the first snapshot.
- Then create a second, temporary snapshot.
- To restore the state from before the changes, select the first snapshot and choose Actions > Revert.
- The server will successfully revert to the state captured by the first snapshot.
Deleting a Snapshot
A snapshot can be deleted while the virtual machine is either powered on or off. Deleting a snapshot does not result in any data loss on the virtual machine. However, all changes made since the snapshot was created become permanent and cannot be undone. It is therefore no longer possible to return to the previous state because the snapshot no longer exists.
To delete a snapshot:
- Find the required server in the list of virtual servers.
- Select Actions > Remove Snapshot.
Snapshot Use Cases
The following examples illustrate the most common uses of snapshots:
- No snapshot – If no snapshot has been created, the virtual machine works just like a physical computer: all changes are immediately applied, and it is not possible to return to a previous state.
- Making critical changes – If you are planning critical changes or operations on a virtual server, such as testing new software, removing a virus, or updating important system components, it is a good idea to create a snapshot beforehand. If something goes wrong, you can simply revert to the snapshot and restore the system to the state it was in when the snapshot was created.
If a server update consists of multiple steps, you can create a snapshot after each successfully completed step. However, only one snapshot can be active at a time, so creating a new one replaces the previous snapshot.
Installing and Using VMware Tools
VMware Tools is a set of utilities that improves the performance and management of virtual machines running on the VMware platform. It is installed directly in the guest operating system and primarily includes drivers for individual virtualized hardware components. Without VMware Tools installed, a virtual server lacks some of the performance and functionality provided by these components.
Although installing VMware Tools is not required, it is strongly recommended. VMs can run without VMware Tools, but some features will not be available and compatibility issues may occur.
The following features, among many others, are available only when VMware Tools is installed:
- significantly improved graphics performance and Windows Aero functionality on operating systems that support it;
- folder sharing between guest and host systems;
- copying and pasting text, images, and files between the client and the virtual machine;
- improved mouse cursor performance;
- time synchronization between the virtual OS and the host/client;
- drivers for virtual network adapters and other virtual hardware components.
Creating a New VM
Before creating a new VM, you first need to create a vApp. vApps are logical groups that allow individual virtual machines to be organized.
If you have not already created a vApp, create one as follows:
- In the left-hand menu, select vApps > New vApp.
- Enter a name for the vApp. Under Add Virtual Machine, you can also create one or more virtual servers immediately.
If you already have existing vApps and want to add a new virtual server to one of them:
- Select the vApp to which the server will be added from the list of vApps, then select Add VM.
- Enter all the required information (see the following figure).
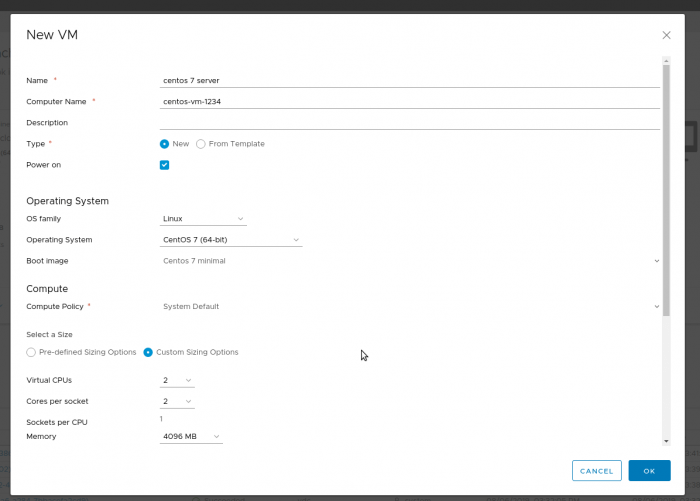
- Name: the name of the virtual server in Cloud Director
- Computer Name: the server hostname
- Description (optional): a description of the server
- Type: here you can choose whether to create a completely new VM or deploy one from a template in the catalog. If you choose to create a new VM, specify the operating system and optionally provide the .iso file containing the operating system you want to install on the server. If you choose to deploy from a template, simply select the appropriate template from the catalog (see the following figure).
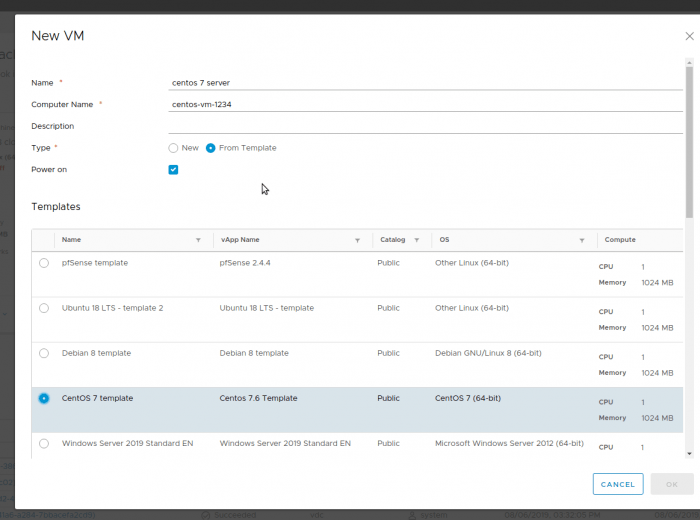
You can now specify the VM’s hardware parameters, such as the number of CPU cores, RAM size, and disk size.
You also need to select the network to which the network adapter will be connected. If the server requires multiple network adapters, you can add them using Add. Under IP Mode, select the IP address. You can either enter one manually or let the system automatically assign an available address from the range (see the following figure).

Creating a Private vApp Network
At the vApp level, you can create a private network and add it to all servers in the vApp, allowing the servers to communicate with each other. This can be useful, for example, for deploying software firewalls.
Create a private network as follows:
- In the vApp overview, find the required vApp.
- Select Actions > Add network.
- Select vApp Network and enter its name.
- Enter the CIDR for the new network, e.g. 192.168.100.1./24. You can also add DNS servers if you want to use this service on the new network.
- You can specify an IP pool from which the system can automatically assign available IP addresses to new servers on the network, e.g. 192.168.100.2–192.168.100.100. The size of the IP pool can be changed later. Using this feature is recommended to help prevent duplicate IP addresses.
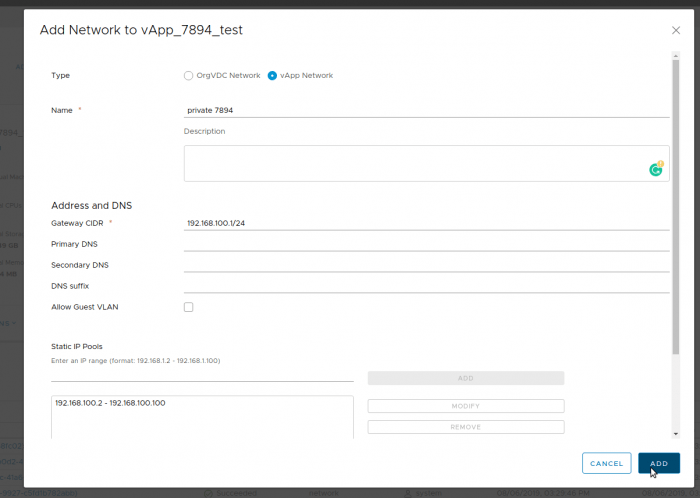
Once the new network has been added, you can assign it to the network adapters of individual servers. The relevant option is available under Details > Hardware.

Working with the Catalog
Cloud Director allows customers to create and manage their own catalog for storing custom vApp templates in .ovf format for quickly deploying virtual servers, as well as .iso files that can then be attached to servers for custom installations, reinstallations, booting rescue CDs, and similar tasks.
To access catalog management, click the hidden menu at the top and select Libraries (see the following figure).
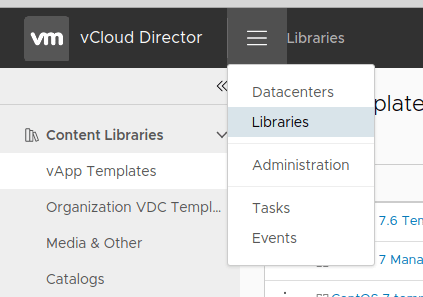
First, you need to create your own catalog. Click Catalogs > New in the left-hand panel, enter a name, and click OK.
Once the catalog has been created, you can add either .iso media or an OVF template.
- Open vApp in the left-hand menu.
- Click Add.
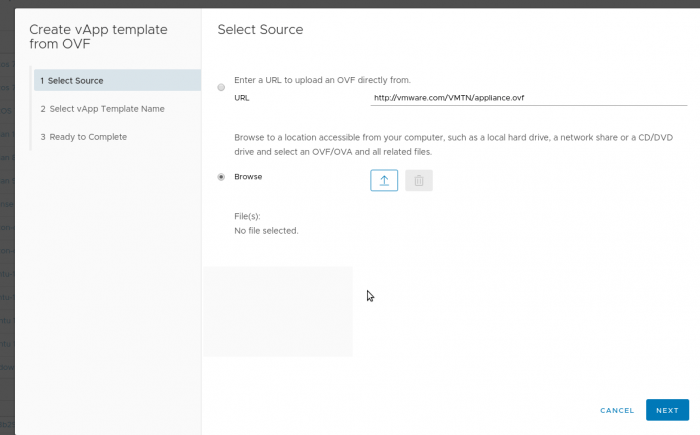
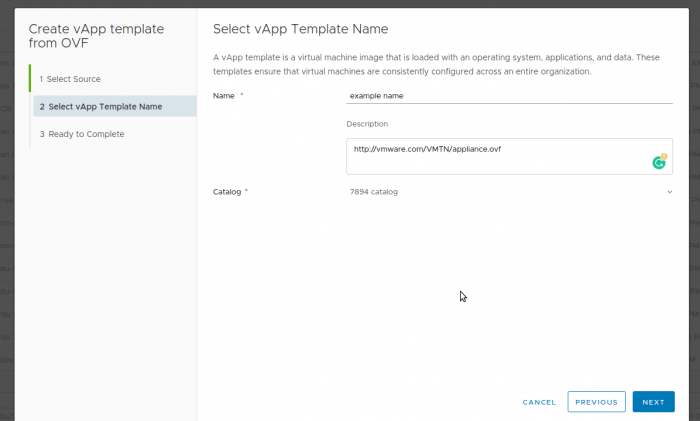
- Select the file source (see the following figures):
a. enter the URL of the file
b. select a file stored locally on your disk - Enter a name and, if required, a description, and select the catalog you created (see the following figures).
- Click Next.
- Check that all the information is correct and click Finish.
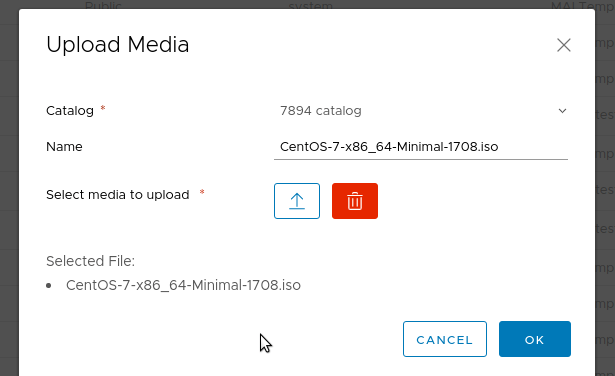
Adding .iso media to the catalog is similar:
- Select Media & Other in the left-hand menu.
- Click Add.
- Select your catalog from the menu.
- Select the file stored on your local disk.
- Confirm by clicking OK.
You can now monitor the upload progress at the bottom of the screen. Once the upload is complete, the media can be attached to a virtual server using Insert Media.
Managing User Accounts and Roles
Within the customer organization, you can create multiple user accounts with custom permissions. This can be useful, for example, when different people manage different servers and these environments need to be logically separated.
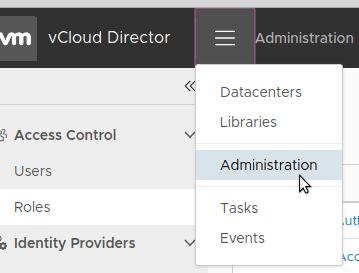
To access the administration menu, click the hidden menu at the top and select Administration (see the following figure).
First, create the role you want to assign to the new user.
- In the left-hand menu, select Access Control > Roles.
- Here, you can see an overview of the default roles that have already been created, including their descriptions.
If none of the available roles meets your requirements, you can create a custom role:
- Click New.
- Enter a name for the role and, if required, a description.
- Configure the actions users with this role should be allowed to perform.
- Save the role by clicking Save.
You can then create users within your organization:
- In the left-hand menu, select Access Control > Users.
- Click New.
- Enter the user’s username and password.
- Select the Enable checkbox to enable the user.
- Under Role, assign the required role to the user.
- Optionally, enter additional information such as the user’s full name or email address.
- Optionally, set quotas for the maximum number of servers the user can create and have running.
- Save the user by clicking Add.
To allow a user to manage a particular vApp, make that user the owner of the vApp. Users with the vApp User role or any lower-level role cannot see the vApp.
- In the left-hand menu, select Compute > vApps.
- Select Actions for the required vApp.
- Select Change Owner and choose the required user.